Installing a new central cooling system in Illinois means planning for humid summers, shoulder-season temperature swings, and code requirements that protect efficiency and safety. This comprehensive guide walks you through everything from load calculations and equipment sizing to duct design, placement, commissioning, and homeowner education. Whether you are collaborating with a licensed contractor or learning how to be an informed homeowner, you will find step-by-step insight tailored to Illinois homes and climate. If you are just starting your research, it helps to frame your project around comfort, efficiency, and longevity—and to understand how each decision supports those goals. For a quick overview of the systems, components, and seasonal needs, see this introduction to air conditioning and how it fits into a whole-home comfort plan.
Why Illinois Homes Need a Thoughtful Approach
Illinois summers can be hot and sticky, with periods of high humidity that strain undersized or poorly installed systems. Winters are cold, which means your cooling system shares ductwork, controls, and sometimes electrical circuits with a furnace or heat pump. This mixed-climate reality makes proper sizing, moisture management, airflow, and air sealing essential. A system that is oversized may short cycle and fail to dehumidify; an undersized system may run continuously yet still leave you uncomfortable. The state’s energy code, based on the International Energy Conservation Code (IECC), encourages tight envelopes and efficient mechanicals, so planning for ventilation, filtration, and fresh air balance is also important.
Pre-Installation Planning and Assessment
Before any equipment is selected, your contractor should perform a whole-home assessment. This is not a quick visual; it is a data-driven evaluation that informs every step that follows.
- Load Calculation: A Manual J or equivalent heat gain calculation accounts for square footage, insulation levels, window type and orientation, air leakage, number of occupants, internal gains from lighting and appliances, and local weather data. It yields the sensible and latent cooling load (temperature and humidity). Do not accept a “rule of thumb” sizing based only on square footage.
- Duct Evaluation: Many Illinois homes have legacy duct systems sized for older equipment. A duct inspection should measure static pressure, confirm adequate return air, identify leakage, and check for restrictions, sharp turns, or crushed/flexible runs that starve airflow.
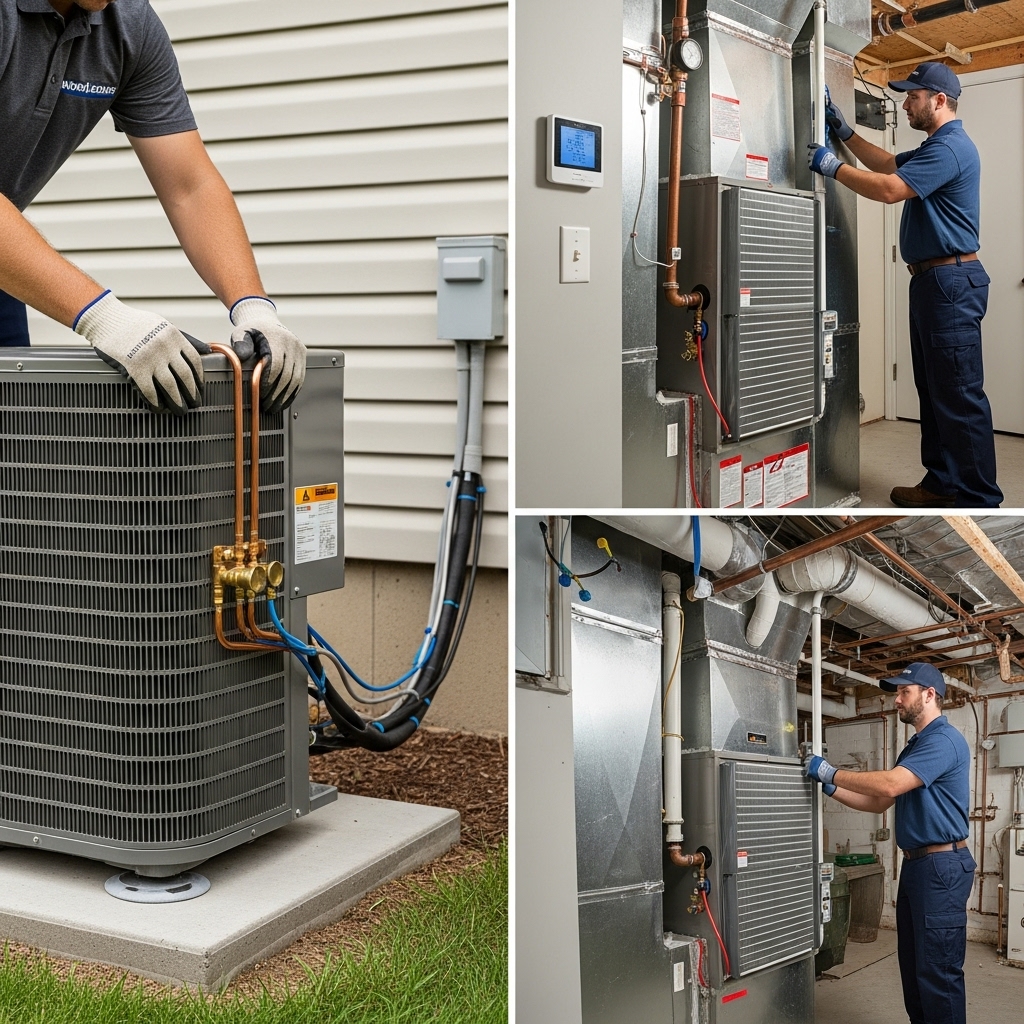
- Electrical Capacity: Your service panel needs the correct breaker size, dedicated circuit, and appropriate wire gauge for the condenser and air handler. Safety disconnects and grounding must be verified.
- Condensate Strategy: Plan for a primary drain with proper fall, a clean trap, and a secondary drain pan with float switch where needed. Illinois homes with finished basements or attics benefit from extra protection against water damage.
- Ventilation and Filtration: Consider MERV-rated filters that balance capture efficiency with airflow, and ensure there is a plan for fresh air where required by code or comfort needs.
- Site Conditions: Document clearances for the outdoor condenser, pad location, sunlight exposure, wind patterns, and proximity to bedrooms, patios, or neighbors to control noise.
Choosing the Right Equipment
The model you choose affects comfort, energy use, noise, and service life. Focus on features that match your load profile and comfort goals.
- Capacity: Based on the Manual J calculation, select a system that meets sensible and latent loads. In humid regions of Illinois, pay attention to latent (moisture) removal.
- Staging: Single-stage systems are simple and affordable; two-stage systems improve comfort and humidity control; variable-speed systems offer the best modulation and quiet operation.
- Air Handler and Blower: A variable-speed ECM blower helps maintain steady airflow, supports dehumidification, and reduces energy use during part-load operation.
- Coil Match: Ensure the indoor coil and outdoor unit are matched per manufacturer specifications for performance and warranty validity.
- Refrigerant Considerations: Newer refrigerants and improved coil designs can influence efficiency and service practices. Confirm that your contractor is trained and equipped for the specific refrigerant your system uses.
- Thermostat and Controls: A smart thermostat with dehumidification logic and fan control can substantially enhance comfort. Compatibility with staging and variable-speed equipment is essential.
Ductwork: The Hidden Backbone
Even the best equipment will underperform with inadequate ducts. Many comfort complaints trace back to poor airflow rather than the condenser itself.
- Sizing and Design: A Manual D duct design aligns with the blower’s airflow and target static pressure. Ducts should be sized to deliver airflow to each room based on room-by-room loads.
- Sealing and Insulation: Seal joints with mastic and UL 181 tape; insulate ducts in unconditioned spaces to reduce heat gain and condensation risk.
- Returns: Provide ample return air paths—preferably dedicated returns in major rooms or well-designed transfer grilles. Starved returns raise static pressure and reduce cooling output.
- Balancing: Use dampers to balance supply to rooms across floors and orientations. Proper balancing ensures even temperatures and reduces hot or cold spots.
Placement of Indoor and Outdoor Components
Where you place the air handler, coil, and condenser affects performance and serviceability.
- Air Handler/Coil: Install on a level platform with adequate service clearance. In basements, consider vibration isolation; in attics, include a secondary drain pan and overflow switch.
- Condenser: Place on a solid, level pad with manufacturer-required clearances for airflow. Avoid dryer vents, roof runoff, or areas with drifting leaves. Provide shade if practical without restricting airflow.
- Line Set: Keep runs as short and direct as possible. Properly size the suction and liquid lines, braze with nitrogen purge, and insulate the suction line end-to-end.
Step-by-Step Installation Overview
- Permitting and Documentation: Confirm permits and code compliance requirements with your municipality. Keep spec sheets and manuals on site.
- Removal of Old Equipment: Safely recover refrigerant, disconnect electrical, remove the old condenser and coil, and cap or flush line sets if they will be reused following manufacturer guidance.
- Set the Condenser: Level the pad, set the unit, verify clearances, and prepare the electrical whip and disconnect.
- Install the Coil and Air Handler: Ensure proper orientation for airflow, slope the drain pan, and install the TXV or metering device per specifications.
- Run Refrigerant Lines: Braze joints with nitrogen flowing through the lines to prevent oxidation, pressure test with dry nitrogen, then evacuate to deep vacuum (target 500 microns or better) and verify decay holds.
- Electrical Connections: Connect the dedicated circuit with correct breaker size, install the disconnect, bond/ground per code, and wire low-voltage controls for staging and fan.
- Condensate and Safeties: Install the primary drain with a clean trap, slope at least 1/8″ per foot, and add a float switch. Include a secondary pan and overflow switch for attic installs.
- Duct Transitions and Sealing: Fabricate tight-fitting transitions, seal with mastic, and secure with screws. Install balancing dampers where planned.
- Charge and Commission: Open service valves or weigh in factory charge per line set length, then fine-tune charge by superheat/subcooling per manufacturer data. Verify thermostat programming.
- Performance Verification: Measure supply/return temperatures, total external static pressure, blower CFM, amperage, and system staging. Confirm dehumidification control and safety switch operation.
Commissioning Checklist for Illinois Conditions
- Airflow: Set blower speed for target CFM per ton, adjusting for static pressure and duct design. Confirm with anemometer readings or a TrueFlow grid if available.
- Charge Optimization: Use local design temperatures and humidity to confirm superheat and subcooling values align with the performance chart.
- Dehumidification: If the thermostat supports dehumidify-on-demand, set the dehumidification setpoint and verify longer, lower-speed cycles for moisture control.
- Noise and Vibration: Check isolation pads, refrigerant lines, and duct hangers. Illinois homes with shared walls or small lots benefit from quieter operation.
- Controls Integration: Confirm proper staging, fan delays, and any lockouts with the furnace if using a shared air handler in a dual-fuel or heat pump configuration.
Homeowner Orientation
After installation, ask your contractor to provide a walkthrough. You should know how to change filters, set the thermostat, recognize warning signs, and contact support. Request copies of manuals, warranty registration confirmation, and commissioning data. Keep these in a dedicated folder for future service visits and any potential home sale.
Maintenance Practices to Protect Your Investment
Proactive care keeps your new system efficient and reliable. Change filters as recommended; keep the outdoor unit free of leaves, grass clippings, and obstructions; rinse the coil gently if debris builds up; and maintain at least two feet of clearance on all sides. In humid stretches, watch for drain performance and clean the trap if needed. Consider professional checkups before each cooling season, which can catch minor issues before they cause discomfort in a heat wave. Mid-summer, evaluate comfort and humidity: if you find you need to run the fan continuously, consult your contractor about dehumidification settings or duct balancing. A well-installed system should deliver even temperatures and steady moisture control across rooms and levels. In the midst of these routines, some homeowners choose to schedule mid-season tune-ups alongside learning more about modern air conditioning features that can enhance comfort without major renovations.
Energy-Smart Operation Tips
- Thermostat Strategy: Use modest setpoint adjustments, avoid frequent manual overrides, and enable dehumidification features when available.
- Shading and Insulation: Improve attic insulation, seal attic hatches, and consider window treatments to reduce solar gain, especially on west-facing rooms.
- Zoning or Bypass Alternatives: If you have multiple floors, ask about zoning or smart dampers to better balance temperatures without overcooling other rooms.
- Ventilation Balance: In tighter Illinois homes, ensure exhaust fans and any makeup air devices are functioning. Balanced ventilation supports indoor air quality and comfort.
Common Pitfalls and How to Avoid Them
- Oversizing: Leads to short cycling, poor dehumidification, and noise. Prevent with an accurate Manual J and right-sized equipment.
- Poor Return Air: Undersized or restricted returns elevate static pressure. Add returns, resize grilles, and remove bottlenecks.
- Improper Charge: Overcharged or undercharged systems can freeze coils or reduce capacity. Always commission with gauges and temperature measurements.
- Neglected Condensate: Missing float switches or traps cause water damage. Include safeguards, especially in finished spaces.
- Skipped Commissioning: Without documented airflow, static, and charge, you cannot verify performance. Require a commissioning report.
FAQs
Q: How long does a typical installation take in Illinois?
A: Many replacements can be completed in one day; more complex projects with duct modifications may take two or more days, especially when permits and inspections are required.
Q: What size system do I need?
A: Size depends on a Manual J load calculation. Two homes of the same square footage can require different capacities due to insulation, windows, and air sealing differences.
Q: Do I need new ducts?
A: Not always, but ducts should be evaluated for leakage, sizing, and available static pressure. Upgrades often improve comfort and reduce noise.
Q: How do I control humidity in muggy Illinois summers?
A: A properly sized system with a variable-speed blower and a thermostat that supports dehumidify-on-demand can significantly improve moisture control. Duct sealing and ventilation also matter.
Q: Will a smart thermostat save energy?
A: Used correctly, smart thermostats help manage schedules, maintain steady temperatures, and optimize run times, which can reduce energy use while boosting comfort.
Q: How often should filters be changed?
A: Inspect monthly during heavy use and replace based on dirt load, filter type, and manufacturer guidance. Pets, renovation dust, and allergies may require more frequent changes.
Take the Next Step Toward Comfortable Living
If you are ready to improve comfort, indoor air quality, and overall home value, schedule a professional assessment and plan your installation with confidence. Ask for a documented load calculation, duct evaluation, and commissioning report so you can verify performance. When you are prepared to move forward, connect with a trusted local team and book your consultation to ensure the details are done right from day one. Start by exploring modern options and scheduling service for reliable air conditioning that meets Illinois standards and your family’s comfort goals.


