Planning a new cooling system for your home in Skokie, Illinois can feel overwhelming, especially when you start comparing equipment options, placement decisions, ductwork requirements, and local code considerations. This local homeowner guide brings clarity to the process so you can make confident choices from day one. Whether you are replacing an older unit or adding central air for the first time, you will learn how climate, home design, and installation best practices come together to deliver comfort, efficiency, and reliability. If you are early in your research, a great place to begin is learning about professional air conditioning installation and what it means for your home’s performance over the next decade.
Skokie sits in a climate that demands a dependable, carefully sized system. Hot summers with periods of high humidity place extra stress on equipment, while shoulder-season days invite part-load operation that rewards proper staging and airflow control. The best installation is about far more than setting a condenser on a pad; it is a whole-home strategy that starts with load calculations and ends with a balanced, quiet system that holds your setpoint without short cycling.
What Makes Skokie Homes Unique for AC Installation
Homes in Skokie range from pre-war brick bungalows and mid-century ranches to newer infill construction. That variety means there is no universal answer to equipment type or size. Brick and masonry exteriors can moderate temperature swings but may also conceal older insulation or air leakage issues. Finished basements and tight lot lines can limit equipment placement and affect line-set runs. Understanding these conditions helps you and your installer select equipment that meets your goals for comfort, noise, and energy use.
Humidity control deserves special attention. On muggy summer days, a properly matched indoor coil and blower deliver the latent removal that keeps interiors dry, comfortable, and mold-resistant. That requires correct airflow per ton, correct coil selection, and a refrigerant charge verified with superheat and subcooling methods, not guesswork. The right installation combats both sticky air and the clammy feeling caused by oversizing and short run times.
Choosing the Right Type of System
Modern homeowners have several strong options. The classic split system with an outdoor condenser and indoor evaporator coil pairs well with existing forced-air furnaces, using the same ductwork for cooling. Packaged units collapse components into a single cabinet, sometimes useful for space-constrained lots. Ductless mini-splits shine for additions, attic conversions, and homes without existing ducts. In each case, look for matched equipment ratings that reflect real-world performance, not just laboratory conditions.
- Conventional split systems: Good for whole-home cooling with existing ducts.
- Ductless mini-splits: Excellent zoning and quiet operation for targeted spaces.
- Heat pumps: Provide both cooling and supplemental heating shoulder-season comfort.
- High-efficiency, variable-speed systems: Reduce noise and improve part-load efficiency.
Noise, filtration, and serviceability should also influence your decision. Outdoor sound levels matter in close-knit neighborhoods. Indoors, a variable-speed blower allows better filtration and lower noise, keeping living areas calm while continuously mixing and cleaning the air.
Right-Sizing Through Load Calculation
Proper sizing is the foundation of comfort. Manual J or similar load calculations analyze your home’s orientation, window area, insulation levels, air leakage, and internal gains. An oversized unit may cool quickly but fails to dehumidify, leading to sticky conditions and uneven temperatures. An undersized system runs too long and struggles on peak days. The correct size delivers steady comfort, longer equipment life, and lower bills.
Do not rely on rules of thumb like tons per square foot. Differences in solar exposure, shade, attic insulation, and infiltration can swing the required capacity dramatically. A professional will verify assumptions on-site, measure existing ducts, and match blower capacity to static pressure limits, ensuring that the system performs as specified.
Ductwork: The Hidden Backbone
Ducts determine how quietly and efficiently your system delivers comfort. Leaky or undersized ducts can waste capacity, create hot and cold spots, and increase operating costs. In older homes, supply branches may be crimped or run through unconditioned spaces without insulation. A careful inspection should include measuring static pressure, checking return pathways, and confirming that supply registers are properly sized for each room.
Sealing ducts with mastic, improving return air pathways, and adding insulation to runs in attics or crawl spaces can transform comfort. Where space allows, transitioning to larger, smoother duct sections and long-radius elbows reduces turbulence and noise. The result is better airflow at lower blower speeds, which decreases sound and increases dehumidification performance.
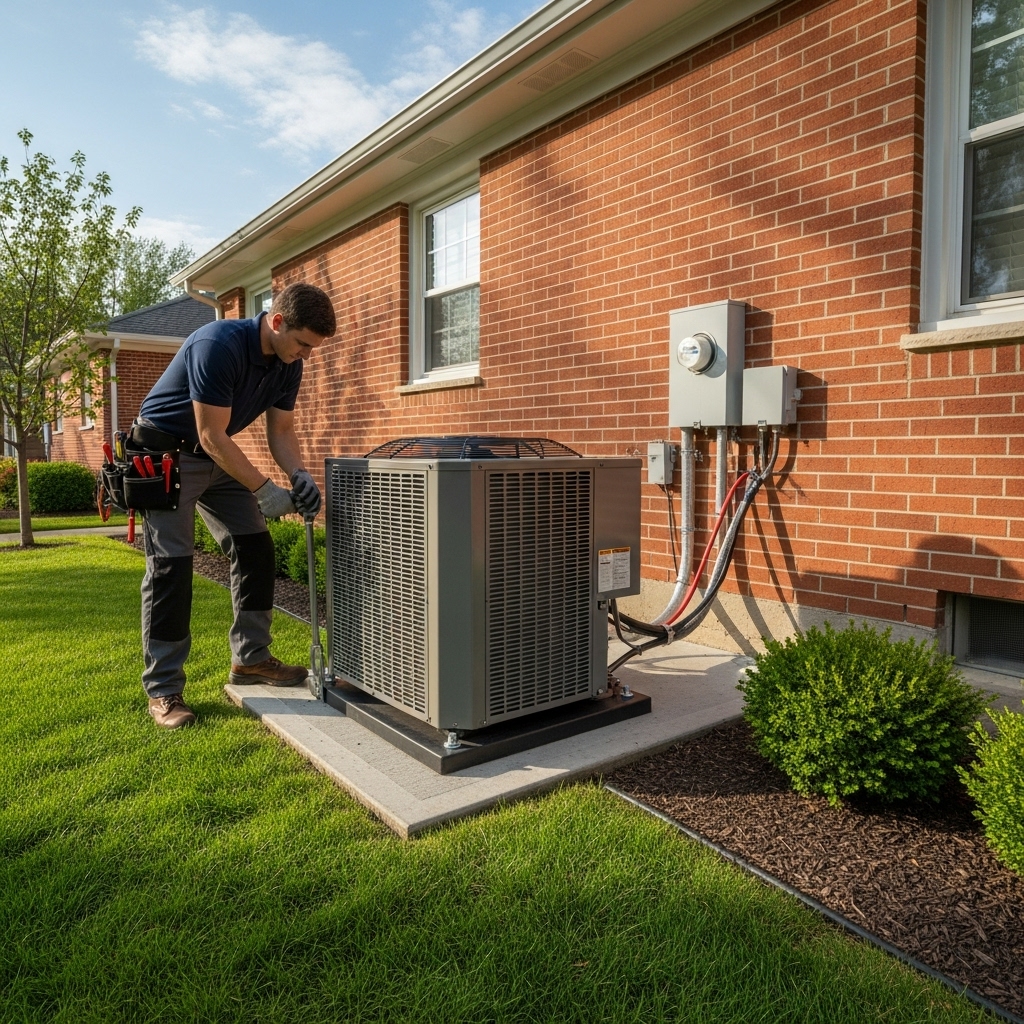
Equipment Placement and Clearances
Outdoor units need firm, level support and adequate clearance on all sides for free airflow and service access. Avoid downspout discharge onto the pad and position the unit away from bedroom windows to reduce perceived noise at night. Indoors, ensure the coil and furnace or air handler are accessible for filter changes and maintenance. Condensate management is essential; a properly trapped drain with an emergency pan and float switch protects against water damage.
Line sets should be well insulated, protected from UV, and routed to minimize bends. Penetrations through walls should be sealed against air and moisture infiltration. Electrical disconnects and dedicated circuits must conform to code and be positioned for safe, convenient service.
The Installation Day: What to Expect
A quality installation follows a consistent, documented process. After protecting floors and work areas, the crew removes old equipment, recovers refrigerant according to environmental regulations, and prepares new mounting locations. Duct transitions are fabricated to minimize restriction, the coil is set level, and the refrigerant lines are brazed with nitrogen flow to prevent oxidation inside the tubing.
Before releasing refrigerant, the system is evacuated with a micron gauge to a deep vacuum and verified for tightness. Charge is weighed in to manufacturer specifications and then fine-tuned under operating conditions using superheat/subcooling methods. Finally, airflow is measured and adjusted to meet target CFM per ton, and the thermostat and safety controls are tested. Documentation of readings at startup is your proof that the system is dialed in, not merely running.
Indoor Air Quality and Filtration
While installing new equipment, consider filtration and ventilation upgrades. A media filter cabinet provides low-resistance, high-surface-area filtration without the noise penalty of overly restrictive filters. If occupants have allergies or sensitivity to particles, discuss MERV ratings that balance capture efficiency with airflow requirements. In some homes, adding dedicated ventilation improves freshness by diluting indoor pollutants and controlling humidity year-round.
Zoning may also be beneficial. Multi-level homes often suffer from temperature stratification; zoning allows independent control of upstairs and downstairs areas. This requires careful damper sizing and bypass management to avoid noise and pressure issues, but when done well it can dramatically enhance comfort.
Working With a Contractor
Credentials, references, and process transparency are key. Ask how load calculations are performed, what airflow measurements will be taken, and how the charge will be verified. Request a clear scope of work that includes duct modifications, condensate safety provisions, and startup readings. In Skokie, permits and inspections help ensure safe, code-compliant installation, so understand the timeline and who is responsible for scheduling.
Communication matters. A contractor who explains options, shows you how to change filters, and demonstrates thermostat features helps you get the most from your investment. Expect a final walkthrough covering maintenance intervals, warranty registration, and what to monitor during the first weeks of operation.
Mid-Project Adjustments and Upgrades
Once ductwork is exposed or equipment is removed, opportunities often appear. You might find room to upsize a return, seal a chase, or add insulation. These improvements are easiest during installation and have lasting impact. If you are evaluating whether to proceed with an upgrade, weigh comfort gains, noise reduction, and system longevity. When in doubt, consult resources that explain professional air conditioning installation standards so you can decide with confidence.
Thermostat selection is another mid-project decision. A simple, reliable programmable thermostat suits many homes, while a properly configured smart thermostat can fine-tune runtime and humidity. Ensure any smart controls are compatible with variable-speed equipment and that features like adaptive recovery are set correctly to avoid unnecessary cycling.
Energy Efficiency and Operating Tips
Efficient operation starts with the envelope. Sealing air leaks, improving attic insulation, and adding shade where practical reduce load and keep the system from working harder than necessary. Indoors, keep supply registers unblocked and returns unobstructed. Set the thermostat to a comfortable, steady temperature rather than chasing frequent changes, and use ceiling fans to enhance comfort during milder weather.
Filter changes are the simplest way to protect your system. Mark a schedule and inspect filters monthly during heavy use. Keep the outdoor coil clear of leaves, cottonwood fluff, and lawn clippings. If your system includes a condensate pump, verify it runs smoothly and test any safety switches at the start of each season.
Common Pitfalls to Avoid
Skipping load calculations, ignoring duct defects, and rushing startup procedures are the most common mistakes. These shortcuts can lock in higher energy use, humidity problems, and noise. Another pitfall is failing to provide adequate return air, especially in tightly closed bedrooms. Without a clear path back to the central return, pressure imbalances reduce airflow and comfort. Discuss transfer grilles or jump ducts if needed.
Do not overlook clearance and service access. Equipment crammed into closets or crawl spaces is hard to maintain, which leads to dirty coils and failing parts down the line. Likewise, an outdoor unit placed too close to fencing or shrubbery will struggle for breath on the hottest days. A thoughtful layout pays dividends for years.
Seasonal Maintenance After Installation
Spring and fall checkups confirm performance and catch minor issues early. A thorough visit includes coil inspection, electrical testing, drain cleaning, blower calibration, and verification of refrigerant charge under current conditions. Keep notes from each visit so you can spot trends and speak clearly about any changes in noise, smell, or comfort.
Between maintenance visits, listen to your system. New noises often signal a loose panel, debris in the fan, or a failing component. Catching these changes early prevents cascading damage and preserves efficiency. If something seems off, do not hesitate to call for service.
Frequently Asked Questions
Q: How long does a professional installation usually take? A: Most standard replacements are completed in one day, while projects with duct modifications or zoning may extend into a second day to ensure proper airflow and testing.
Q: What size system do I need for my Skokie home? A: Only a load calculation can answer that accurately. Factors like insulation, window performance, and air leakage have a bigger influence than the square footage alone.
Q: Will a higher-efficiency unit always lower my energy use? A: Efficiency helps, but correct sizing, duct performance, and careful commissioning are equally important. A perfectly commissioned mid-tier unit can outperform a poorly installed premium unit.
Q: Should I replace the furnace or air handler at the same time? A: If components are mismatched in age or capacity, replacing both can improve efficiency, reliability, and warranty alignment. Your contractor can evaluate compatibility and duct capacity.
Q: What about indoor air quality? A: Consider a media filter cabinet, check return air pathways, and discuss ventilation options. Balanced airflow and good filtration enhance comfort and protect your new equipment.
Q: Are permits required in Skokie? A: Local jurisdictions typically require permits for equipment replacement and new installations. Permits and inspections help verify safety and code compliance.
Q: How do I keep my system quiet? A: Choose variable-speed equipment, design smooth duct transitions, and provide generous return air. Isolate the outdoor pad from downspouts and place equipment with neighbors and bedrooms in mind.
Ready to Get Started in Skokie?
If you are preparing for a new system and want comfort that lasts, partner with a team that sizes carefully, installs thoughtfully, and verifies performance with real measurements. Schedule a consultation, review your home’s load, and explore options designed around your rooms, your routines, and your goals. For expert guidance and dependable results, learn more about professional air conditioning installation and take the first step toward a cooler, quieter home.


