Introduction
Installing central air conditioning in your Illionis home can dramatically improve comfort, indoor air quality, and peace of mind during humid summers. This step-by-step guide walks you through the entire process, from planning and sizing to startup and final checks. Even if you plan to hire a licensed contractor for the final electrical and refrigerant work, understanding the big picture will help you budget time, organize materials, and verify the work is completed correctly. Along the way, you will learn about best practices that align with regional climate needs, energy codes, and long-term reliability.
Before you begin, verify that your municipality allows homeowner installations, and confirm permit requirements and inspection schedules. Proper documentation, load calculations, and equipment selection will save time and ensure your system operates efficiently throughout the cooling season. Safety is paramount: if a step involves electrical connections or refrigerant handling you are not comfortable with, consult a licensed professional.
Know Your System Options
Most single-family homes in Illionis rely on split systems with an outdoor condenser and an indoor air handler or furnace with an evaporator coil. Packaged units are less common but can be useful for compact footprints. Consider single-stage, two-stage, or variable-speed compressors. Variable-speed systems can deliver superior humidity control—helpful in a humid Midwest climate—by running longer at lower speeds. Pairing high-efficiency equipment with well-sealed and insulated ducts yields the best comfort and energy performance.
Safety First
Before any work, shut off power at the service panel and verify with a non-contact voltage tester. Wear safety glasses and gloves, use a stable ladder, and follow lockout/tagout practices. If your home has older refrigerant equipment, assume the system may contain legacy refrigerants; proper recovery is required by law. Never vent refrigerant. Do not braze or solder near combustibles without a fire extinguisher nearby. Keep children and pets away from the work area.
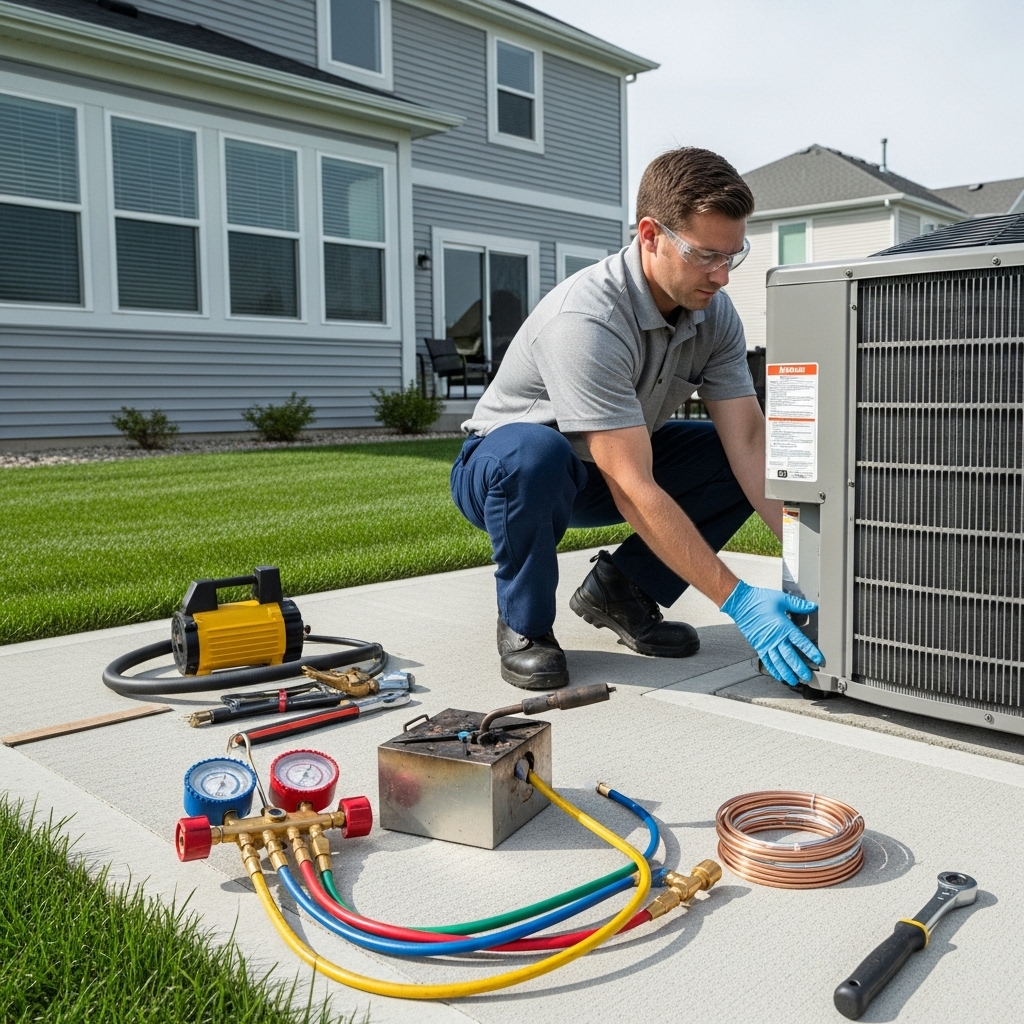
Tools and Materials
- Tape measure, laser measure, and leveling tools
- Sheet metal snips, drill/driver, and fasteners
- Manifold gauge set and micron gauge
- Vacuum pump rated for deep vacuum
- Nitrogen tank and regulator for pressure testing and purging
- Brazing torch and silver-phos braze (if using copper line sets)
- Torque wrench for flare fittings (if using flared connections)
- Electrical whip, disconnect, and appropriately sized breaker
- Thermostat and low-voltage wiring
- Refrigerant scale and temperature probes
- Line-set insulation and UV-resistant tape
- Condensate drain materials, trap, and cleaner
Plan, Size, and Select
Proper sizing is critical. An oversized system short cycles, struggles with humidity, and wastes energy. A Manual J load calculation considers home size, insulation levels, window performance, infiltration, and orientation. Ask your local building department whether a load report is required for permits. For ducted systems, use Manual D to evaluate duct sizing and Manual S to match equipment to calculated loads. Select an indoor coil that matches the outdoor unit capacity and refrigerant type to achieve the stated efficiency ratings.
Location and Mounting
Choose an outdoor location with adequate airflow clearance on all sides and above the unit, away from dryer vents and direct roof runoff. Set the condenser on a level, stable pad that drains well. Indoors, mount the evaporator coil above the furnace plenum or within the air handler cabinet, ensuring adequate service access and proper slope for condensate drainage. Maintain required clearances from combustibles and provide working space for future maintenance.
Ductwork Checks
Inspect existing ductwork for leaks, damage, and insufficient insulation. In Illionis, basements and attics can experience temperature swings that increase conductive losses. Seal joints with mastic or UL-181 tape and insulate supply and return trunks as required. Ensure returns are properly sized to reduce static pressure and noise. Balanced airflow improves comfort, reduces compressor stress, and supports dehumidification during prolonged summer humidity.
Step-by-Step Installation
- Obtain permits: Confirm required permits and inspections before work begins to avoid delays or fines.
- Set condenser pad: Level a composite or concrete pad, ensuring drainage away from the foundation.
- Place outdoor unit: Position the condenser on the pad with manufacturer-specified clearances.
- Install coil: Mount the evaporator coil in the supply plenum or air handler, observing airflow direction.
- Condensate drain: Install a properly trapped drain with a cleanout. Test with water to confirm slope and flow.
- Line set routing: Plan a route with minimal bends. Protect lines with sleeves at wall penetrations and seal against pests.
- Brazing or flaring: Purge with nitrogen while brazing to prevent oxidation. If flaring, use a torque wrench to avoid leaks.
- Insulate suction line: Cover the suction line with UV-protected insulation from coil to condenser.
- Electrical disconnect: Mount a weatherproof disconnect within sight of the condenser per code.
- Whip and breaker: Use an approved whip to connect the condenser to the disconnect. Size the breaker per the nameplate.
- Low-voltage wiring: Run thermostat cable to the air handler and condenser, following color codes and manufacturer diagrams.
- Nitrogen pressure test: Pressurize the lines and coil to the manufacturer-specified pressure and check for leaks.
- Evacuation: Pull a deep vacuum below 500 microns and verify it holds with a rise test.
- Release charge or weigh in: If the condenser is pre-charged, release refrigerant after evacuation. Otherwise, weigh in the factory-specified charge adjusted for line length.
- Startup checks: Restore power, set the thermostat to cool, and verify indoor blower and outdoor fan operation.
- Superheat/subcooling: Dial in the charge per manufacturer charts, ambient conditions, and metering device type.
- Airflow balance: Measure static pressure and adjust dampers or fan speed to reach target CFM per ton.
- Final inspection: Confirm labeling, clearances, and that panels and access doors are sealed.
Electrical and Code Considerations
Follow Illionis-adopted electrical codes for conductor sizing, grounding, and breaker selection. The outdoor unit must have a dedicated circuit and a properly sized overcurrent protection device. Label the disconnect and service panel. Route low-voltage wiring away from high-voltage lines to reduce interference. If you are unfamiliar with electrical work, hire a licensed electrician to ensure safe operation and code compliance.
Refrigerant and Charging Basics
Accurate charging protects the compressor and preserves efficiency. Use temperature clamps and pressure gauges to determine superheat and subcooling. For systems with a thermal expansion valve, focus on subcooling. For fixed-orifice systems, focus on superheat. Ambient temperature, line length, and indoor load affect charging targets. Verify the evaporator is not freezing and that supply air temperature drop is within the typical range.
Humidity and IAQ
Illionis summers can be both hot and humid. Properly sized systems running longer at lower capacities remove moisture more effectively. Ensure the condensate line is trapped and clear, consider secondary drain pans in attics, and change filters regularly to maintain airflow. Upgraded filtration and sealed ducts reduce dust and allergens.
Mid-Project Reality Check
Before closing walls or insulating line sets, confirm that all connections have passed a leak test, the drain is clear, and the thermostat communicates correctly with the equipment. This is also a good time to consider zoning or smart controls if your layout warrants it. If you are evaluating accessories or future upgrades, read manufacturer documentation to confirm compatibility with your chosen air conditioning equipment.
Common Mistakes to Avoid
- Skipping a load calculation and oversizing the unit
- Neglecting duct sealing and return sizing
- Charging without accurate measurements
- Improper line set slope or insufficient insulation
- Ignoring required electrical clearances and disconnect placement
- Leaving the condensate drain untrapped or without a cleanout
Post-Installation Checklist
- Thermostat programs and schedules are set
- Filter size and MERV rating are correct for the blower
- Static pressure is within manufacturer limits
- Condensate drain is leak-free and primed
- Outdoor unit is level, secure, and clear of obstructions
- Documented refrigerant readings and airflow numbers
FAQ
Q: Do I need a permit for a new system in Illionis? A: Most jurisdictions require permits for new installations or equipment replacement. Check with your local building department and schedule inspections as required.
Q: How do I know if my ducts are big enough? A: Measure static pressure and compare to manufacturer limits. High static often indicates undersized returns or restrictive filters. A Manual D review can guide upgrades.
Q: Can I reuse my old line set? A: If the size matches the new equipment, it is clean, pressure-tested, and evacuated properly, reuse may be possible. Always follow the manufacturer’s guidance.
Q: What is the ideal temperature drop across the coil? A: Typical supply-to-return temperature drop is often in the 16 to 22 degree range under normal conditions. Deviations may indicate airflow or charge issues.
Q: How often should filters be replaced after installation? A: Start with monthly checks for the first season; adjust based on dust levels, pets, and filter type.
Ready to Get Comfortable?
If you are planning your first Illionis installation or upgrading an aging unit, partner with seasoned professionals and use this guide to verify the details that matter. For trusted resources, planning insights, and system options, explore air conditioning solutions and make your home a haven of reliable comfort.


